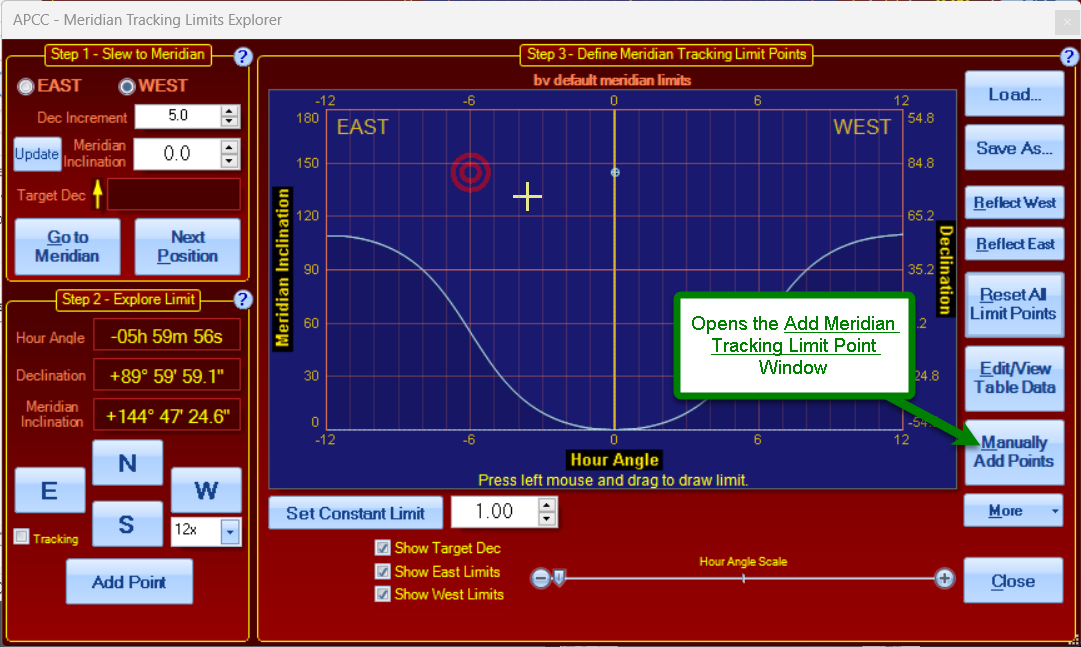
The Manually Add Points button on the right side of the Meridian Tracking Limits Explorer opens a new window for adding points to your limit mapping.

There are two primary situations where the manual method may be more appropriate:
1.You have already created a data set, perhaps on a spreadsheet, that you would like to easily transfer into the Meridian Tracking Limits Explorer.
2.You want to move the mount with the keypad to quickly put together a "rough" set of limits for a star party or portable setup.
In general, we recommend using the conventional method in the previous section: Using the Meridian Tracking Limits Explorer. This method is primarily for advanced users and for those who prefer keypad operations with their mount.
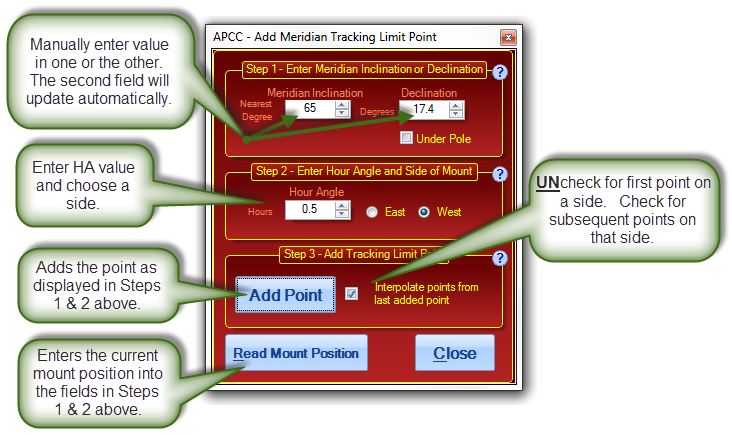
Clicking the Manually Add Points button will open the following window:

We will look at three procedures for making use of the "Add Meridian Tracking Limit Point" window:
1.Making a quick set of limits with the keypad, or similar button control
2.Entering data from an existing table
3.Editing part of an existing curve to reflect a change.
Making a quick set of limits with the keypad, or similar button control
You can make a surprisingly effective set of meridian limits for a star party or other short-term setup with the keypad and this window in a very short time.
The First Point
1.Start with a cleared Meridian Tracking Limits Explorer window by pressing the "Reset All Limits" button.

2.Slew to a spot above the horizon away from your pole that you consider your "horizon limit." A very easy way to do this is to go to the Horizons Tab and double click the approximate point on the horizon graph where you wish to go.
3.As long as you are close to the meridian, and on the correct side, simply adjust the declination to your acceptable horizon height. Don't worry about RA if you are relatively close.
4.UNCHECK THE INTERPOLATE CHECKBOX IN THE STEP 3 PANE!
5.Click the "Read Mount Position" button
6.Enter 0.0 as the hour angle in the Step 2 Pane to overwrite the hour angle read from the mount.
7.Click "Add Point."
8.RE-CHECK THE INTERPOLATE CHECKBOX IN THE STEP 3 PANE!
Subsequent Points
9.Slew to the next point you wish to add. Move in both RA and Dec.
10.Click the "Read Mount Position" button
11.Click "Add Point."
12.Return to step #9, and repeat until you are done or have reached the pole.
The Last Point on a Side Remember that you cannot cross the pole!
13.Adjust the RA and Dec while watching the hour angle values in the Meridian Tracking Limits Explorer window. If you pass the pole, the hour angle value will change sign and jump 12 hours, for example from +2 to -10 hours.
a.Adjust the Dec to be as close to 90 as you care to make it (does NOT need to be real close!) without jumping to the below-the-pole hour angle.
b.Adjust the RA to your limit.
14.Click the "Read Mount Position" button
15.Click "Add Point."
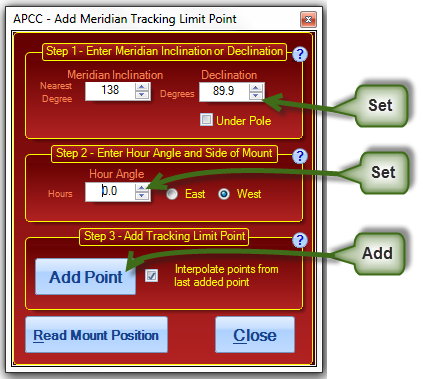
16.Set the Declination value in the Step 1 pane to 89.9 (Northern Hemisphere) { –89.9 in the south }
17.Set the Hour Angle to 0.0 in the Step 2 pane.
18.Click "Add Point." This will finish the side.

Last Point
Unless you have a very lopsided camera setup or pier, you can probably simply reflect this limit for the other side. Otherwise, repeat the procedure STARTING WITH STEP #2 - NOT STEP #1!
Entering Data from an Existing Table
If you created a table or list of data that gave the "safe" and "unsafe" declinations for your system, you can copy that information into the "Add Meridian Tracking Limit Point" window.
1.UNCHECK THE INTERPOLATE CHECKBOX IN THE STEP 3 PANE!
2.Enter an hour angle of 0.0, and a Dec. or Meridian Inclination for your horizon away from the pole.
3.Click "Add Point."
4.RE-CHECK THE INTERPOLATE CHECKBOX IN THE STEP 3 PANE!
5.Enter the next values of hour angle and Dec. from your data.
6.Click "Add Point."
7.Return to step #5, and repeat until you are done or have reached the pole.
8.Set the Declination value in the Step 1 pane to 89.9 (Northern Hemisphere) { –89.9 in the south }
9.Set the Hour Angle to 0.0 in the Step 2 pane.
10.Click "Add Point." This will finish the side. (See screen shot above)
Unless you have a very lopsided camera setup or pier, you can probably simply reflect this limit for the other side. Otherwise, repeat the procedure STARTING WITH STEP #2 - NOT STEP #1!
Editing Part of an Existing Curve to Reflect a Change
The trick to using the "Add Meridian Tracking Limit Point" window to edit an existing set of Meridian Tracking Limits is to get into the limit mapping, and then out of the mapping without creating a problem.
1.Load the Limit file that you wish to edit or modify.
2.UNCHECK THE INTERPOLATE CHECKBOX IN THE STEP 3 PANE!
3.On the graph for the limit in the Meridian Tracking Limits Explorer window, hover the mouse over the exact spot where you wish to START your edit. A white data box will appear with the coordinates for that spot.
4.Note the Hour Angle and Dec. or Meridian Inclination for the spot.
5.Enter these values in the Step 1 and Step 2 panes
6.Click "Add Point." A blinking square dot will appear on the graph to show you where you are.
7.RE-CHECK THE INTERPOLATE CHECKBOX IN THE STEP 3 PANE!
8.Make your edits and changes. After the last change proceed to Step 9 below.
9.On the graph for the limit in the Meridian Tracking Limits Explorer window, hover the mouse over the exact spot where you wish to END your edit. A white data box will appear with the coordinates for that spot.
10.Note the Hour Angle and Dec. or Meridian Inclination for the spot.
11.Enter these values in the Step 1 and Step 2 panes
12.Click "Add Point." You are done
13.Save the edited limit if you wish.
