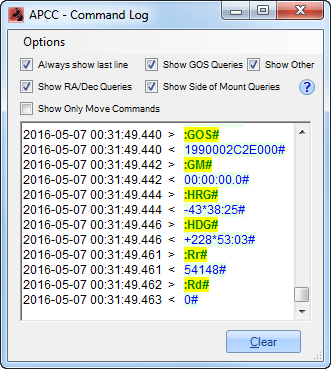
Log Window
Command Log Window
This window displays a running log of the communications to and from the mount. It shows commands and inquiries issued to the mount indicated by the “>” symbol and the mount’s response indicated by the “<” symbol. Maintaining a log is vital when troubleshooting and/or providing a record of events.
The Log Window can be accessed from the Menu: Tools > Log Window.
The Setup Tab includes a checkbox to Enable Logging to disk. It is not possible to uncheck the box at this time. We want to assure that log files are created so that we can better assist you if you encounter any issues.

Options: Click on Options to reveal the following choices:
Clear Window: Removes the activities that have taken place from the display window.
Always on Top: Provides the choice to hold the window in the foreground over other applications or to let it drop behind them. It can be toggled on and off.
Save to File: Allows you to name and save a record of this activity in the folder of your choice. It will capture the events up to the moment of saving the file.
Always Show Last Line: If checked, automatically scrolls to show the current communications.
Show RA/Dec Queries: If checked, activates the display of RA and Dec position status.
Show GOS Queries: If checked, activates the display of the operational status of the mount.
Show Side of Mount Queries: If checked, activates the display of the mount’s east or west positioning.
Show Other: If checked, activates the display of all the other mount queries.
Show Only Move Commands: Check this box is you only want to see the move commands that are sent to the mount.
Clear button: Clicking the Clear button will clear the record, allowing you to begin a fresh command log. This is convenient when you want to isolate specific events and mount behavior.
If you wish to zip the log file for future reference or send for analysis, refer to the Log Zipper Window section.
