Initialization /Edit Initialization Window
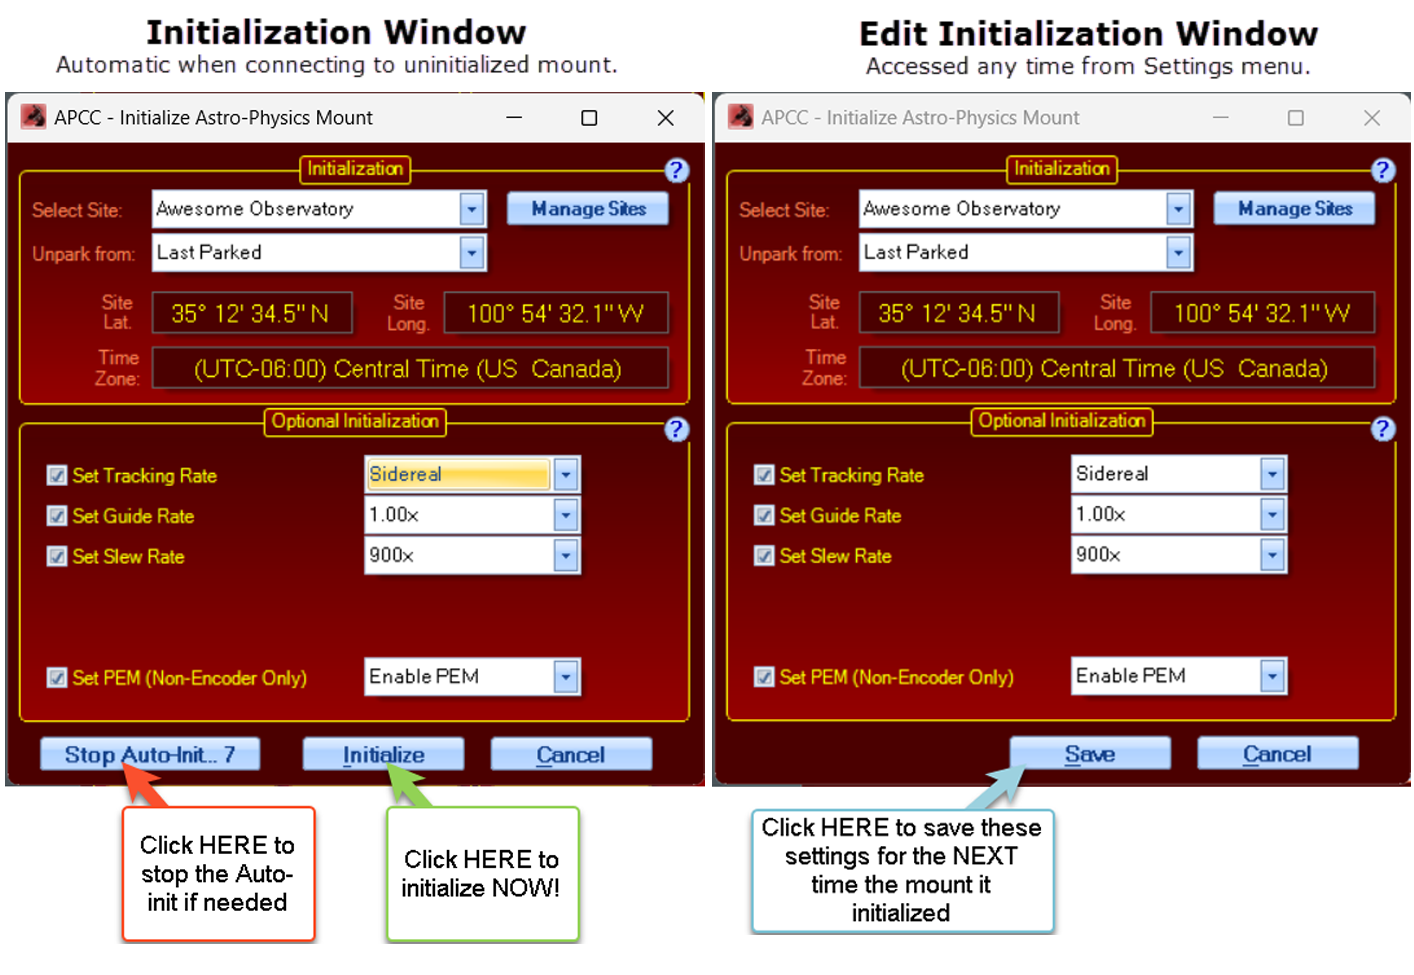
This window can take two formats: It can appear upon connection to an uninitialized mount immediately prior to initialization, or it can be opened as a savable window from the Settings menu for convenient editing.
Whenever APCC detects that the mount needs to be initialized (right ascension = 0 and declination = 90), the Initialize Astro-Physics Mount window will open. By default, if you do nothing, whatever parameters have been set up in this dialog window will execute in a user-defined number of seconds. (Default is 10 sec. See the Advanced Settings section under Main Window => Setup Tab) However, you can stop this auto-initialization by clicking the button Stop Auto-Init. This will allow you to check your settings and change them, if you wish. You will NOT normally stop the auto-init sequence.
Useful Tip: Most users will want to select Auto-Initialize from the Advanced Settings Window so that initialization by APCC is automatic. If that option is checked, the window on the left will appear every time you start APCC after power-cycling the mount. Permanent setups where the various options are not likely to change can select a very short wait time in the Advanced Settings window - 1 or 2 seconds is usually fine. Portable users will want to set longer time intervals to allow time to check settings and possibly temporarily stop the auto-init to make changes. |

IMPORTANT: The window on the left above will NOT appear if you have already initialized the mount (including initializing the mount with another source, such as the keypad). Also bear in mind that the mount remains initialized until it is power cycled. Remote observatories that leave power on to the mount (not recommended in case of damaging lightening storms) will maintain an initialized state in the mount and will therefore not see this window upon startup of APCC.
At any time, you can access the editable version of this window under the Settings Menu to adjust the settings. This should be the normal way to change initialization settings. Re-initializing an already initialized mount with new information can result in changes to the mount's knowledge of where it is pointed. Therefore, the editable version DOES NOT have an initialize button.
Initialization
The primary initialization functions tell the mount its current location and give it the current time and date. The initialization also initiates the "unpark" calculations that re-establish the mount's pointing. For mounts that have been manually moved or set up in the field, the primary initialization functions also can include syncing the mount to a predefined Park position.
Select Site: Selects the site that will be used to initialize the mount. APCC will use the site's latitude, longitude, time zone, elevation, default temperature and pressure. To edit or create new sites, click the Manage Sites button.
Manage Sites: Click this button to bring up the Manage Sites Dialog.
Unpark from: This selects the park position from which APCC will unpark. Usually you will want to select "Last Parked." This is true even if you park to a defined park position. The only time you would normally unpark from a defined position is if you are setting up the mount or if you have moved the mount via the clutches. Refer to the Park Positions section if you are unsure of the various options.
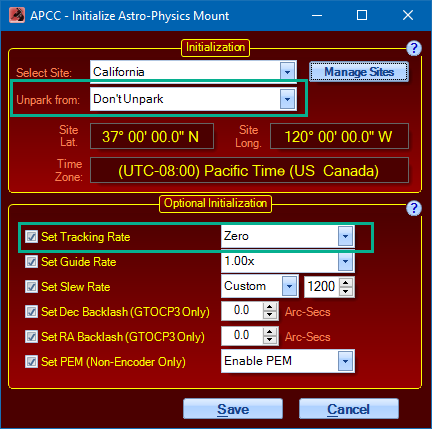
NOTE: You can also set the Unpark from: position to Don't Unpark (or Set Tracking Rate to Zero) if you do not want the mount to start tracking after initialization. Both are shown as examples in this screenshot:

Unpark Now: Clicking this button will allow you to unpark the mount from one of the Park positions. You cannot use this button if you have Last Parked selected. You typically would use this button to unpark after you have physically moved the telescope to one of the Park positions. Refer to the Park Positions section if you are unsure of the various options.
Optional Initialization
A basic initialization will give the mount the necessary information to calculate its position (time and location data) and will unpark the mount to either its calculated pointing position, or to a user selected pre-defined Park position. You may, however, wish to set other operating parameters as part of your general start-up / initialization process. These other parameters can be set automatically at initialization by checking the boxes and selecting the values in the options listed below.
Note that the the keypad, or any other software can set its own parameters which can override the parameters you set here at initialization. The GTO Servo will always act on the last parameter that it received for any given option below.
•Set Tracking Rate: If this option is checked, the selected tracking rate is sent to the mount. If this option is not checked, the mount will begin tracking at the default sidereal rate.
•Set Guide Rate: Guide rate is no longer configurable. The guide rate of 1.0x is the recommended guide rate and the only option available.
•Set Slew Rate: If this option is checked, the selected slew rate will be used for slews from within APCC. If this option is not checked, the default slew rate of 1200x (600x for the 3600GTO) will be used. Note the auto-population of slew rate is only available when running P02-01 or later.
•Set PEM: If this option is checked, periodic error correction can be forcibly enabled or disabled during initialization. If this option is not checked, PEM will remain disabled. Note that encoder mounts do not use PEM and will never have PEM enabled.
Command buttons
Stop Auto-Init: Stops the auto-initialization process. This button is not present in the Initialization window accessed through Settings since it is not needed there.
Initialize: Clicking this button will initialize the mount with whatever parameters you have defined above. If you have stopped the Auto-Initialization to make changes to your settings, this will then complete the initialization process. The rates on the Rate Settings tab will update.
Save: This is the alternate button to the "Initialize" button that is found in the editable version of the Initialization Window that is accessed from the Settings Menu.
Cancel: Clicking this button will cancel the initialization and any changes you have made to the settings will not be saved. You may wish to do this if you will be initializing later after downloading new GPS site information.
